


Handyman bathroom fan installation is able to assist you with the installation of a bathroom exhaust fan. Give us a call right away to have a discussion about your requirements.
Alternately, continue reading for additional information about bathroom exhaust fans as well as installation instructions broken down step by step. We have experience installing a large number of exhaust fans and would be happy to assist you with your installation.
General installation tips:
Before you get started, it is important to make sure that your bathroom exhaust fan will be vented out of the best location for your home by doing your research and making the necessary preparations. The instructions that are provided below are for an exhaust fan with a vent that exits through the sidewall. However, you have the option of venting the fan through the roof or through the soffit of your home instead. Because of the high level of moisture in the exhaust, a bathroom exhaust fan must always vent outside and must under no circumstances vent into the basement, the crawlspace, or the attic.
Installation:
First, get your materials together and get yourself organized.
Gather all of the required materials before beginning the installation of the bathroom exhaust fan. These can be obtained by visiting a store specializing in home improvements, such as Home Depot or Lowe’s.
Step 2: Turn off the power, and decide where you want your fan to be placed.
Turn off the power to the bathroom you’ll be installing the fan in before you start.
Get out your pencil and make a mark on the ceiling of the handyman bathroom fan installation to indicate where you want the exhaust fan to go. In an ideal world, this would be located in some part of the bathroom on the way to the shower.
Make a hole in the roof of the house that leads to the attic by using your electric drill and a particularly long spade bit. When you are up above the ceiling, this will assist you in finding the location where the installation was performed.
Step 3: Mark and then cut out the hole for the exhaust fan’s intake.
Return to the restroom and look for the reference hole you wrote down. In the event that you were forced to drill a new one, check that you are using the appropriate hole in your work.
Take measurements inside the intake hole of the exhaust fan, and then use a pencil and a framing square to draw a rectangle on the ceiling that corresponds to those measurements. The rectangle should be drawn in the location where the fan vent ought to be.
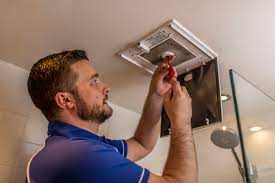
Position and fasten the fan in place (Step 4)
You’ll need to climb back up into the attic and use foil duct tape to attach the duct elbow to the housing for the exhaust fan.
Place the fan over the hole in the ceiling where the exhaust fan is located and between the joists. Using drywall screws, fasten the metal brackets to the joists so that they are secure. After securing it with foil duct tape, connect the flexible duct that came with the wall cap kit to the elbow that was previously attached to the exhaust fan.
You can use either a new or existing electrical cable to thread through the connector, after which you can secure it with a screw.
Step 4: Create an opening for the exit.
Next, remain where you are and prepare the hole in the sidewall of your house while you are up in the attic. Find the spot in your house where you want the Ideally, this should be in a location that can be accessed from the outside, should be between two studs, and should be no more than six feet away from the exhaust fan.
You should first drill a reference hole, then proceed to make the cut outside of your house. To create the exit hole in the side wall, cut a passageway through it with a hole saw measuring 4 inches.
Attach the exhaust duct to the wall hole and the exit cap, which is the fifth step.
To connect the flexible ductwork to the exit cap, you will need to return to the attic where you started. Tape aluminum foil over the seams to secure them.
Pull the exit cap through the wall hole while you are standing outside the house, and secure it so that it is snug against the siding of your house. If there are any gaps between the cap and the siding, you can cut a foam-rubber gasket to fill them.
When positioning the cap, use a very small amount of silicone adhesive, and then fasten it with four screws measuring one and a half inches.
Connecting the wires is the sixth step.
Return to the Handyman bathroom fan installation bathroom in order to access the housing for the exhaust fan. Remove the blower motor’s screws, then unscrew it and set the screws to the side.
To gain access to the electrical wiring, the built-in receptacle must first be removed from the interior of the exhaust fan. Move the screws to the side of the housing.
Connect the wires from this electrical site to the electric cable that you have already been working on in an earlier step. Make sure that you connect wires of the same color to each other; connect black to black and white to white.
Step 7: Fasten the grille to the ceiling, and run a test on your fan
After reconnecting the blower motor to the electrical receptacle found inside the exhaust fan, re-adjust its position using the screws that were previously removed.
Attach the plastic grille to the front of the fan housing on the exhaust fan.
Turn the power back on in the bathroom, and give the ventilation fan a try.https://tensionmatleyaar.com/3-alternatives-to-classic-sneaker/